Final Reflections

I quote The Doors front man Jim Morrison when he said, “This is the end”. However it is not the end in the way you might interpret it. The course I have participated in, “Creating and Publishing Digimedia”, has finished but my interest in certain topics, in particular, Audio Podcasting and Digital Photography has not.

I thoroughly enjoyed creating my first Audio Podcast and I am looking into starting my weekly podcast talking about American Football. I will make it easy to subscribe to through iTunes and an RSS feed. In the weekly podcast I will talk about recent news, injury reports and I will also give a recap of the previous weeks games as well as previewing the upcoming ones.

I will continue to use Audacity which I found is a very useful tool when I was editing my Audio podcast for my assignment.

When I sat down to check the course the first thing that struck me was how easy it now is to communicate ideas to a global audience. The knowledge I have gained in respect to social media tools such as Linkedin and Twitter.

I have found that my use of those media tools has increased as a result of the course. I am also now more aware of the specific language used to communicate effectively. When using twitter it is more effective to tweet original content with audio/video Podcasts or your blogging site instead of posting a link to your site. Doing that doesn’t allow any interaction between you and your followers. This might cause you to lose your audience as you are spamming them.

When blogging at the start of the course I would proofread the posts before publishing them and I found my use of passive language was dreadful. Over the entire course this has gradually improved and I am now very active in watching my use of language so that it does not lose focus.

Finally, I would like to say that I really enjoyed the course as it provided me a completely different learning experience in that ‘Creating and Publishing Digimedia’ has been a practical hands on subject. It is a refreshing change to work directly with the leading technologies available today.

I would to finish with this humorous photograph I took earlier this year in Offaly…..Maybe the world should focus on Ireland’s nuclear program!!!!

funny cloud formation

Funny Cloud Formation

Week 11- Digital Photography

Our last project, the digital photography portfolio, was a challenging one. I had never looked at taking photographs in a professional sense. In class we learned a lot about the depth of field and aperture as well as the rule of thirds that I found helped me most.

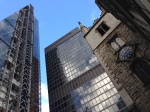
When deciding on what theme to go with I have always had an interest in buildings and how the appearance and materials used have changed over time. So I looked at framing contrasting buildings that were in near to each other so that the difference could convey a powerful message.

portfolio

Polished Marble & Concrete

I made sure not to include the entire buildings in the frame because the theme would have lost some of its message. I took photographs with blocks of one building beside the side of the other one. This worked well as it showed the difference the DOF and how it is used to make it seem that the buildings are right on top of each other. I also used the sky in a couple of the shots as a reference for and I think it created some interesting angles for the frame.

I labelled each photograph with a title I thought would show the viewer my clear direction with each shot.

Week 10- Search Engine Optimisation (SEO)

Last week in our class we looked at ways to increase the reach of your page to the rest of the internet community. Search Engine optimisation (SEO) can be defined by the online resource Webopedia as, “…a methodology of strategies, techniques and tactics used to increase the amount of visitors to a website by obtaining a high-ranking placement in the search results page of a search engine– including Google, Bing, Yahoo and other search engines.”

I researched the use of keywords in the searching of webpages online. I went back and looked at my earlier blog posts and I reviewed the posts keywords in mind. I made sure each paragraph kept the focus on the subject of the blog and at the bottom of each post I created some tag words that will link to each post. Those tag words are vital to each blog post and will help to enhance my blogs appearance in search engines.

An example of the tags I used for one of my blog posts was in Week 5, “Landscape and Portrait Photography” were ‘, ‘effective’ , ‘, ‘, and ‘I used ‘Google Webmaster Tools’ to check how effective my keywords were when searching for each of my blog posts. I then changed the tag word ‘effective’ as this was not effective in searching for the post in week 5. I was glad to use the tool so I could see how picking the right keywords is important in reaching the most relevant audience. The keyword I used instead of ‘effective’ was  ‘ and this worked a lot better when I checked my keywords again on the Google Webmaster Tool.
Google Webmaster Tools

Patrick Altoft (2013). Google Starts Showing More Than 2500+ Linking Domains in Webmaster Tools. [ONLINE] Available at: http://www.branded3.com/blogs/now-you-can-see-more-than-1000-linking-domains-in-google-webmaster-tools/. [Last Accessed 25 November 2013].

Week 9- Digital Photgraphy Portfolio

I have completed tasks already involving aperture, DOF and shutter speed as well as retouching an image too using digital editing tools.

This week I really have had to get thinking about what theme I am going to use for my photographic portfolio. To complete my portfolio I have to produce six high quality photographs that contain all aspects of what we worked on in previous weeks. They don’t have to show how we use those techniques but to merge the different techniques providing an overall effective shot is the key to the assignment.

I have to say choosing my theme has been a very difficult task. I know that picking a subject that I find interesting is the best way to narrow down the choices. Particular subjects I do have an interest in is American Football, Soccer and Horse Racing. When I was in London recently for the American Football I happened stay near the financial district around Tower Bridge. I went in search of ‘The Gherkin’ building so I took a few photographs of that. The building is fine as a subject but in terms of finding a theme for it; I struggled.

'The Gherkin' at a distance

‘The Gherkin’ distance shot

Here is my shot of the Gherkin building from a distance. The subject of the photograph is clear to see but the theme is not.

I traveled closer to the Gherkin and I looked around for inspiration. Upon arrival at the Gherkin I saw it standing beside a building that had stood there for over a hundred years. Suddenly a thought turned the light on in my head; the theme could be buildings old and new.

I started to take photographs around the Gherkin trying to capture a photograph of the two buildings in the one shot. This took a few minutes; I moved on to find other subjects to fit the theme.

Only about a mile away the new skyscraper called ‘The Shard’ and in its midst an old spire of a church that was now home to a tourist information office.

Old and New- Pic 2

‘The Shard & Chapel’

The original idea for ‘The Shard’ was inspired “by the railway lines next to the site, the London spires depicted by the 18th- Century Venetian painter Canaletto, and the masts of sailing ships.

I was happy with these two subjects following my theme of ‘Old and New’. I took a shot of the two buildings lying down so that I was staring into the sky. With the blue of the sky in the background it created a wonderful canvas to highlight the two buildings creating a clear focus.

Old and New- Pic 1

‘The Gherkin’

When I got home I looked through the photographs I took of the Gherkin and I managed to find one that got the two buildings into the same frame. I think it shows a wonderful contrast of the two buildings with the old building seeming to lean on the new one.

Now I will be on the lookout for different subjects to complete my photography portfolio. I would welcome any comments on my photographs to let me know that I am going in the right direction in terms of theme because if it isn’t I still have time on my side to reconsider my ideas.

Week 8- Online Digital Presentation

Our next big assignment was an online digital presentation using the digital presentation tool, Prezi. I looked around the website and it had examples of Presentations highlighting its interactive capabilities. The animations and graphics were very impressive. I also liked the way the presentations are not linear and each slide uses in different places around the screen. There is very little constriction in terms of where you place the content and what content you want to use.

I quickly decided on the subject of the Audio Podcast and more specifically how to create an RSS feed. The Audio Podcast was an earlier assignment I completed for the course and I particularly enjoyed the aspects of creating the content for the podcast but also finding out how to use the different platforms to make my Audio podcast available to as many potential listeners as possible.

In Prezi we had to start with a blank template so that allowed me the freedom of incorporating any ideas that I had. It also was difficult at first because I was given so much scope; it makes it hard to narrow down the choices!!! I did eventually decide to use an RSS icon as the centre piece to my presentation. I used a background for RSS feed that made the icon seem beamed by satellite around the world. The message I tried to convey was that the RSS feed is accessible accessed everywhere.

With the RSS feed icon there were existing bubbles used in the design in the top right hand corner and I thought they were perfect to hold some of my frames. I placed the other circular frames in the rainbow shaped designs in the center of the icon. The content I placed in the frames were a step by step guide on how to create and post a link to your RSS feed into a page on a WordPress account. I explained that as well as using external websites such as Feedburner (a service run by Google that allows you to create a self hosted RSS feed) you can use a website to host your RSS feed for you and I used Podomatic. This RSS feed can then be subscribed to Apples iTunes site. A person has to send a podcast that has no unsuitable language. iTunes reviews the podcast and validates it so that any user in the world that locates it on iTunes can subscribe to it.

As well as placing a link to my Feedburner RSS feed I also added a link to my iTunes RSS feed. These two links were out in a separate page entitled ‘Audio Podcast’.

The last and most important part of the assignment was to make sure that all the links provided were working properly. There would be point in going through all the previous steps just to fall at the final hurdle! Luckily they all worked for me.

That was just a summary of the steps I used in the Prezi presentation. My main hope for my presentation was that as well as providing a fun, interactive experience that the viewer was also shown in a clear way how to successfully use RSS feeds to deliver your subject of choice used in your audio podcast to the rest of the internet community.

Prezi Digital Presentation
 

Week 7- Audio Podcast

Hi everyone, this week I am talking about my audio podcast I created. I first had to decide on a subject to discuss in the podcast. The podcasts time limit two minutes long and we could not go over that so having to stay within the time frame was challenging. I chose to talk about what I have learned in the course so far. I wrote out a the first draft of the potential content I was going to place in the audio podcast. I then arranged it into a written speech. The next step was timing myself reading it out and then I saw it was over the two minutes. The next part was fun condensing down the information in the podcast, quality control.

After I finished tinkering with  the content I recorded it on my laptop with the Audacity program. Before I recorded the podcast I needed to find a suitable place to record it. The place had to have soft furnishings as we learned in class if there are too many hard surfaces such as concrete the sound bounces off them and creates unwanted background noise. I  tried a few places such as my room; I covered the walls with towels but it is a small, angular room so it didn’t work out. I found my location…in my car. The key was that there was no wind and I live in a quiet area so there is little passing traffic. I took my laptop into the car and made my recording. I was happy with the results because when I was editing the piece I found little background noise. I took out a few unwanted pauses and faded in and out podcast.

The next stage in the process of successfully uploading an audio podcast was to send the podcast online and create an RSS feed that viewers can subscribe to. I also uploaded my audio podcast to iTunes. The website I used for my self hosted audio podcast was Feed Burner. This is a website that creates an RSS feed for you in a few easy steps. I also used a host site called Podomatic to host my RSS feed for me.

To complete the task I went into my WordPress account; set up a new page titled ‘Audio Podcast’ and pasted my RSS feed links into the browser. That has allowed other viewers of my page easy access to listen to my Audio Podcast.

Here is a link to my WordPress Audio Podcast page where all my RSS links are available for subscription. Alternatively you can get access to the Audio Podcast at the top of this blog and click the link titled, ‘Audio Podcast’.

Week 6- Editing Digital Images

I had a lot of fun on this weeks task. The task was selecting a photograph on Retouch Pros’ restoration challenge section which I then edited and played around with a few of the features to try to bring the photograph back to life. The program I used for this task was Picasa. I found it very easy to upload and edit images using Picasa. All of the tools were easy to find along the left side. I also thought the having the undo button so easily accessible it allowed for some exploration of different techniques.

Before Image
The restoration challenge I chose was #100 and the image was of a girl posing for a portrait photograph. As you can see the image was quite damaged with rust stains and was missing some parts of the photograph around the edges.
My plan for this photograph was to keep an authentic feel for the image whilst repairing enough of the damage.
I started by clearing up the rust stains. I used the retouch tool to clone parts of the image that were similar in colour to the damaged part so it replaces it. I was careful using the one spot to retouch some areas because the pattern becomes grainy if it used over and over on the one spot and can look unrealistic.

After Image
I changed the contrast of image; I added more shadow around her face and hair to highlight those features. I also softened the image too using a filter. I was happy with the colour and filters so I went back to retouch any areas of damage that showed up after using the filters. Some areas of damage did show up so it is always a good idea to re-examine the image so that it holds its integrity. Finally the missing areas of the image around the edges were too severe to fix so the best option was to get rid of them. I used the cropping tool in Picasa to take them out of the photo. If I left the damage there it would detract from the real subject of the image therefore losing its focus.  Here is the image after my restoration attempts; I hope you like it.

Week 5- Landscape + Portrait Photography

This week I looked into framing a photograph correctly to the particular subject that I’m studying. Landscape photographs are a wide shot and is best used with subjects such as mountain ranges. Also, if you want to take in a complete scene and not unintentionally crop an important item of that scene it is very useful. I looked at a couple of websites to further my education in the subject and I came across a useful resource with an article called, “When to shoot in Landscape or Portrait Mode”, which David Peterson wrote. David explained in clearly and concisely terms how a landscape photograph is effective for certain shots.
Portrait photographs differ from landscape as they have a narrow frame that usually is better used when taking a large single object such as a skyscraper or if you want to have a deeper spatial perspective for your subject.
I have included my examples below of how portrait and landscape photos are effective when used correctly.
Landscape not effective I took a sculpture as my subject to show portrait works better than landscape in some circumstances. In the landscape photograph it is clearly seen that there’s no clear subject as the landscape has brought two bikes into the frame and that can confuse the viewer. Portrait used effectively I then took a photograph using portrait framing and the subject can clearly be seen by the viewer. I didn’t want to photograph the sculpture in the middle of the frame so I thought about the rule of thirds and placed it to the side as placing it in the middle tends to bore the viewer. The portrait photograph for the subject in my opinion is a lot more effective in capturing the sculpture where we can isolate the subject and draw the viewer’s attention to it.
Portrait used ineffectively I decided to take a different subject to convey the advantages of using landscape framing compared to portrait. My subjects were an old and new structure. The old structure was a boundary wall and the new structure was a weir for a stream. The two structures are beside each other so it made framing the scene a lot easier.
When I took the portrait photograph it cropped most of the weir out of the frame so the subject is not clearly defined. All the viewer can see is the wall and some metal railings. When the viewer realizes the subject is “Old and New Structures”, they can see that the image is a poor representation of the subject.Landscape used effectivelyA landscape view gives the subject and the complete scene becomes more clearly defined than the restriction the portrait view had given it disappears. The weir can and the wall are both included in the shot and the subject is an accurate reflection of the photograph.


Week 4- Further Digital Photography (Shutter Speed)

For this weeks task shutter speed was our focus. Shutter speed determines how much light is let pass into the lens of a camera. A slow shutter speed allows a lot of light in therefore showing less detail and creating a motion blur of the moving subject. For high shutter speeds an object could be moving very quickly but by allowing less light in, the end product is a detailed photograph.

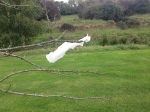
I had to decide on a particular place and subject to show different shutter speeds effectively. My front garden was the perfect. It was a rather windy day so I hung the very edge of a tissue to a branch on a bare tree so the effect could be clearly seen.

The first photo I took was of the tissue at a fast shutter rate. This snapped the tissue moving with the image still clear as well as the background images.

high shutter speedThe faster shutter speed has allowed me to take a photo of the tissue while it is blowing without losing the clear focus of the object. In my opinion this shows how effective a faster shutter speed is when capturing a fast-moving object. The detail of the object makes it clearly identifiable that it is a tissue.

An interesting tutorial I found on the internet was courtesy of an online community called, “Cambridge in Colour”. The website explained the different uses of shutter speed and how the effects could be maximized. There was also a shutter speed calculator that gives you the “minimum shutter speed needed to make a moving subject appear sharp in an 8×10 inch print.” The calculator is a useful tool if you needed a photo for demonstration in an e-journal on the uses of shutter speed as the images would have to perfect to illustrate effectively. shutter speed 2

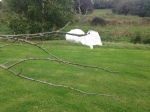
The second image I took used a slower shutter image. The tissue seemed to take on a life of its own in the photo becoming quite ghostly. I can see how photographers in the early 20th Century used the effect of shutter speed to fool people into thinking they had taken a photograph of a spectre.

My subject blurs in the image to show how when more light pours through a lens it can create  a dream like effect in the photograph.

Week 3- Digital Photography- Beginnings

In week 3 we began to learn about digital photography and the basic workings of a camera. After our lecture I looked at the documentary,‘The Genius of Photography’. Our lecturer brought the documentary to the classes attention and I am really glad I took time out to view it. The documentary really opened my eyes to how accessible Photography is when compared to the time it really took off in the early 20th Century. It also occurred to me that anyone can take a really brilliant photograph. Practice, practice and more practice seems like the order the day aligned with a basic understanding of the principles that make a good photo.

Displaying Depth of Field

Displaying Depth of Field

In class we discussed Aperture and Depth of Field (DOF). With Aperture it is the opening in the window of the lens that light through. An F-Stop tells the user how open or closed the window of the lens is. The smaller the window the deeper the DOF (higher F-Stops) is allowing more of the scene in focus; like a photograph with the subject being a safari wide shot of the Savannah. Whereas with a large window (lower F-Stops) is creates a shallower DOF; this could be used for a portrait photograph.
The class was given a task to photograph any particular subject but to show that you have an understanding of the aperture. My photographs subjects were a leaf, a bush and a bridge. The leaf being in the foreground; the bush in the middle ground and the bridge being in the background. By using a lower amount of F-stops I was able to focus on the leaf in the foreground and blur the bush and bridge in  the middle and background of the image. I was very impressed with this photo as I had never attempted anything like this before I undertook the task. I took me a while to get the right shot but when I did I just knew it was the one I wanted to publish in my Digital Photography Portfolio.